Tutorial
For documentation please check docs in our repository.
This tutorial is written for Python, however, everything should work analogously in other languages. The tutorial assumes you are using a Linux machine so the paths use "/". Additionally file extensions may differ (e.g. dll instead of so, exe instead of nothing).
- Installation
- Shortest Working Example
- Basic Example (in detail)
- Configuration Files
- Performing Actions
- Modes of Operation
- Custom Scenarios
- Available Buttons
- Custom key Bindings
- Q-Learning in Theano and Tensorflow
Installation
Follow the build instructions - now you should be able to import vizdoom from anywhere on your system.
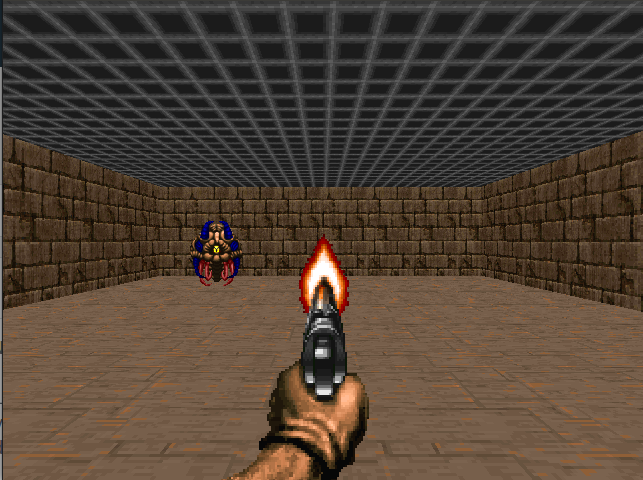
Clone ViZDoom, go to examples/python and run basic.py. You should see the Doom marine (his hand actually) shooting randomly at a monster.
freedoom2.wad is a free resource file with textures and other visual-related resources used by the game engine. The textures often differ from the original Doom's textures. Unfortunately, the original Doom2.wad file is proprietary, so we are not allowed to redistribute it - if you want to have nicer textures you need to acquire the file on your own (e.g., buy it on steam or gog) and place it in ViZDoom's installation path (e.g. /usr/local/lib/python2.7/dist-packages/vizdoom/doom2.wad) or set it with set_doom_game_path.
Shortest Working Example
This example should be run from the examples/python subdirectory.
Below you can find a shortest reasonable example of how to use ViZDoom environment. It loads the configuration from a file and initializes the environment. Then, it runs 10 episodes with an agent making random actions. The agent gets a state and prints the obtained reward. (In the loaded scenario specified in the basic.cfg, the agent gets rewards for each action which is -1 for each time tick, -6 if he shots but misses, and 100 if he kills the monster.). The example uses the synchronous mode, so the game engine waits with the next frame for the agent decision, regardless how long it takes. Since the random agent makes decisions very quickly, for visualization purposes, we included a short sleep.
#!/usr/bin/env python

from vizdoom import *
import random
import time

game = DoomGame()
game.load_config("vizdoom/scenarios/basic.cfg")
game.init()

shoot = [0, 0, 1]
left = [1, 0, 0]
right = [0, 1, 0]
actions = [shoot, left, right]

episodes = 10
for i in range(episodes):
    game.new_episode()
    while not game.is_episode_finished():
        state = game.get_state()
        img = state.screen_buffer
        misc = state.game_variables
        reward = game.make_action(random.choice(actions))
        print "\treward:", reward
        time.sleep(0.02)
    print "Result:", game.get_total_reward()
    time.sleep(2)
Basic example (in details)
Configuration
Let's go through the example in
basic.py
, line by line.
Import is a good start (''from vizdoom import *'' would be much more concise):
from vizdoom import DoomGame
from vizdoom import Button
from vizdoom import GameVariable
from vizdoom import ScreenFormat
from vizdoom import ScreenResolution
We import a couple of classes:
- DoomGame - represents the game, it is the interface between the game engine and the agent,
- Button - an enumeration representing "buttons" (actions) that can be "pressed" by the agent (e.g., MOVE_LEFT, ATTACK),
- GameVariable - an enumeration representing the auxiliary state information that can be extracted from the game (e.g., HEALTH, AMMMO),
- ScreenFormat and ScreenResolution - enumerations representing available screen resolutions and formats (e.g., RES_640X480, CRCGCB, RGB24).
Remember that Python, by default, will look for the library to import in the working directory.
We start by creating a DoomGame object. Before it is ready to play with, it requires configuration and initialization. The following code configures the paths for all required external files:
game = DoomGame()
game.set_doom_scenario_path("../../scenarios/basic.wad")
game.set_doom_map("map01")
Where:
- Doom scenario - resource
*.wadfile, which defines how a world works and look like (maps). A couple of simple scenarios are provided with ViZDoom but custom ones can be easily created with e.g., Doom Builder or Slade. - Doom map - a single wad file (scenario) may containt multiple maps you can choose from (default:
map01)
You can also set some rendering options. The following code sets the screen resolution, the screen buffer format, and whether to render particular visual elements such as the crosshair or the HUD:
game.set_screen_resolution(ScreenResolution.RES_640X480)
game.set_screen_format(ScreenFormat.RGB24)
game.set_render_hud(False)
game.set_render_crosshair(False)
game.set_render_weapon(True)
game.set_render_decals(False)
game.set_render_particles(False)
Now, we should determine which buttons can be used by the agent. If we skip this step, no buttons will be available, so the whole endeavour will be pretty pointless.
game.add_available_button(Button.MOVE_LEFT)
game.add_available_button(Button.MOVE_RIGHT)
game.add_available_button(Button.ATTACK)
Next, we can determine which game variables (health, ammo, weapon availability etc.) will be included in the state we get in each timestep. Any game variable can be acquired anytime during the game but having them in the state may be more convenient. Here, we include only AMMO2, which is the pistol ammo:
game.add_available_game_variable(GameVariable.AMMO2)We also specify some other settings such as the visibility of the window, the episode timeout (in tics/frames), or start time (initial tics are ommited by the environment but internally, the engine still runs them). Start time is useful to ommit initial event like spawning monsters, weapon producing etc.
game.set_episode_timeout(200)
game.set_episode_start_time(10)
game.set_window_visible(True)
In the basic world, life is mostly painful and agents get a bonus -1 reward for each move no matter what happens. It's achieved by setting the living reward.
game.set_living_reward(-1)Finally, we can initialize the game, after which the Doom's window should appear:
game.init()Game runtime
A single Doom "game" is called an episode. Episodes are independent and finish on player's death, timeout, or when some custom conditions are satisfied (e.g., the agent acomplishes some task), defined by scenario. In this example, the episode finishes after 300 tics or when the monster gets killed. Each action produces a reward: -6 for shooting and missing, 100 for killing the monster, and -1 otherwise (it would be -5, 100 and 0 accordingly but the living reward is set to -1).
for i in range(episodes):
    print("Episode #" + str(i + 1))

    # Starts a new episode. It is not needed right after init() but it doesn't cost much. At least the loop is nicer.
    game.new_episode()

    while not game.is_episode_finished():

        # Gets the state
        state = game.get_state()

        # Which consists of:
        n           = state.number
        vars        = state.game_variables
        screen_buf  = state.screen_buffer
        depth_buf   = state.depth_buffer
        labels_buf  = state.labels_buffer
        automap_buf = state.automap_buffer
        labels      = state.labels

        # Makes a random action and get remember reward.
        r = game.make_action(choice(actions))

        # Makes a "prolonged" action and skip frames:
        # skiprate = 4
        # r = game.make_action(choice(actions), skiprate)

        # The same could be achieved with:
        # game.set_action(choice(actions))
        # game.advance_action(skiprate)
        # r = game.get_last_reward()

        # Prints state's game variables and reward.
        print("State #" + str(n))
        print("Game variables:", vars)
        print("Reward:", r)
        print("=====================")

        if sleep_time > 0:
            sleep(sleep_time)

    # Check how the episode went.
    print("Episode finished.")
    print("Total reward:", game.get_total_reward())
    print("************************")
Acting in the Doom's world involves getting the current state (get_state), making actions (make_action) and obtaining rewards. get_state returns a GameState object and make_action takes an action as an input and returns a reward. The action should be a list of integers of the length equal to number of available buttons specified in the configuration (3 in this example: left, rigth, attack). Each list position maps to corresponding button so, e.g., [0,0,1] means "not left, not right, attack!". If the input list is too short, 0 will be used in the missing positions.
Strictly speaking actions sould be specified as lists of integers but internal representations of booleans comes up to integers so using boolean lists (e.g. [False,False,True] instead of [0,0,1]) is possible and semantically more acurate. However, integers should be used when specifying non-binary actions(like LOOK_LEFT_RIGHT_DELTA).
Finally, you can terminate the DoomGame. It should be done automatically on program exit (or when you reassign the variable used by the DoomGame object)
game.close()Configuration Files
Instead of configuring the experiment in code, you can load it from configuration file(s). Each file is read sequentially, so multiple entries with the same key will overwrite each other.
Format
Each entry in a configraution file is a pair of key and value separated by an equal sign ("="). The file format should also abide the following rules:
- one entry per line (except for list parameters),
- case insensitive
- lines starting with # are ignored,
- underscores in keys are ignored (episode_timeout is the same as episodetimeout),
- string values should not be surrounded with apostrophes or quotation marks.
Violation of any of these rules will result in ignoring only the line with the error.
List parameters
available_buttons and available_game_variables are special parameters, which use multiple values and instead of a single value they expect a list of values separated by whitespaces and enclosed within braces ("{" and "}"). The list can stretch throughout as many lines as you like as long as all values are separated from each other by whitespaces.
Each list assignment (KEY = { VALUES })clears values specified for this key before (in other configuration files or in the code). Also, the *append operator(KEY += { VALUES })** is available. This way you can more easily combine multiple configuration files and tinker in code.
An example:
#doom_game_path = ../../scenarios/doom2.wad
doom_scenario_path = ../../scenarios/basic.wad
doom_map = map01

# Rewards
living_reward = -1

# Rendering options
screen_resolution = RES_320X240
screen_format = CRCGCB
render_hud = True
render_crosshair = false
render_weapon = true
render_decals = false
render_particles = false
window_visible = true

# make episodes start after 20 tics (after unholstering the gun)
episode_start_time = 14

# make episodes finish after 300 actions (tics)
episode_timeout = 300

# Available buttons
available_buttons =
    {
        MOVE_LEFT
        MOVE_RIGHT
    }
#
available_buttons += { ATTACK }

# Game variables that will be in the state
available_game_variables = { AMMO2}

mode = PLAYER
doom_skill = 5

#auto_new_episode = false
#new_episode_on_timeout = false
#new_episode_on_player_death = false
#new_episode_on_map_end = false
Other examples can be found here
Performing Actions
make_action
The most basic way to perform an action is to use the make_action method, which takes a list of button states and returns a reward - the result of making the action. Additionally, a second argument can be specified: tics which tells the environemnt to perform the same action tics number of frames (we call it "frame skipping". Skipping frames can improve performance of the game (no rendering).
advance_action and set_action
Unfortunately make_action method does not let you interfere with whatever happens during the skipped frames. To enable more versatility you can get more fine-grained control with set_action and advance_action:
...
game.set_action(my_action)
tics = 5
update_state = True # determines whether the state and reward will be updated
render_only = True  # if update_state==False, it determines whether a new frame (image only) will be rendered (can be retrieved using get_game_screen())

# action lasts 5 tics
game.advance_action(tics)

# doesn't update the state but renders the screen buffer
game.advance_action(1, not update_state, render_only)

# skips one frame and updates the state
game.advance_action(2, update_state, render_only)

...
Modes
ViZDoom has 4 modes of operation:
PLAYER
The PLAYER mode lets the agent perceive the state and make actions. PLAYER mode is fully synchronous, thus ZDoom engine will wait for the agent to make_action or advance_action.
SPECTATOR
The SPECTATOR mode is intended mainly for apprenticeship learning and allows you (the human) to play the game (using keyboard and mouse) while the agent reads states of the game and your actions (get_last_action). The SPECTATOR mode is synchronous as well, so the engine's processing will wait until the agent gives his permission to continue (advance_action). The SPECTATOR mode is designed to run 35fps, so fast computations on agent's side will not cause overall acceleration. On the other hand, failing to match the speed of ~35fps will result in slow or/and choppy gameplay.
A snippet showing a sample episode in SPECTATOR mode:
game = DoomGame()

#CONFIGURATION
...

game.set_mode(Mode.SPECTATOR)
game.init()

episodes = 10
for i in range(episodes):
    print("Episode #" +str(i+1))

    game.new_episode()
    while not game.is_episode_finished():
        s = game.get_state()
        game.advance_action()
        a = game.get_last_action()
        r = game.get_last_reward()
        ...
 ...
ASYNC_PLAYER & ASYNC_SPECTATOR
ASYNC versions of the PLAYER and SPECTATOR modes work asynchronously. It means that the engine runs at ~35 fps and does not wait for the agent to perform make_action/advance_action - being late results in missings tics. On the other hand, advance_action/make_action waits for the engine to process the next frame, so there is no risk of responding to the same state multiple times.
Custom Scenarios
To create a custom scenario (iwad file), you need to use a dedicated editor. Doom Builder and Slade are the software tools we recommend for this task.
Scenarios (iwad files) contain maps and ACS scripts. For starters, it is a good idea to analyze the sample scenarios, which come with ViZDoom (remember that these are binary files).
KEEP THIS IN MIND
ACS and software for creating wads is quite simple and relatively user friendly but sometimes they act unexpectedly without notifying you so here are some thoughts that can potentailly help you and save hours of wondering:
- 1.0 and 1 is not the same, the first one is the fixed point number stored in int and the second one is an ordinary int. Watch out what is expected by the functions you use cause using the wrong format can result in rubbish.
- Use UDMF format for maps and ZDBPS which is node (whatever that is) builder for Zdoom.
Reward
In order to use the rewarding mechanism you need to employ the global variable 0:
global int 0:reward;
...
script 1(void)
{
    ...
    reward += 100.0;
}
...
ViZDoom treats the reward as a fixed point numeral, so you need to use decimal points in ACS scripts. For example 1 is treated as an ordinary integer and 1.0 is a fixed point number. Using ordinary integer values will, most probably, result in unexpected behaviour.
User Variables
GameVariable represents non-visual game data such as ammo, health points or weapon readiness, which can be present in state or can be extracted at any moment. It is also possible to access user variables (USER1, USER2 ... USER32), which correspond to ACS scripts' global variables 1-32.
global int 0:reward;
global int 1:shaping_reward;
global int 2:some_int_value;
...
script 1(void)
{
    ...
    reward += 100.0;
    ...
    shaping_reward += 10.0;
    ...
    some_int_value += 1;
}
...
By default, the USER variables are treated as ordinary integers, so using fixed point numbers inside the script will result in a rubbish output. However, you can turn the rubbish into meaningful data using doom_fixed_to_double function.
...
rubbish = game.get_game_variable(GameVariable.USER1)
legitimate_integer = game.get_game_variable(GameVariable.USER2)
meaningful_data_as_double = doom_fixed_to_double(rubbish)
...
Available Buttons
ViZDoom uses "buttons" as constituents of actions like ATTACK of MOVE_LEFT. Most of buttons support only binary values and they act like keyboard keys. More specifically they use boolean values or integers (which are intepreted as bools: 0 is False and everything else is True).
There are, however, 5 special buttons which accept negative and positive values. Names of these buttons end with "DELTA" and they emulate a mouse device. Value range of delta buttons can be limited by set_button_max_value() method
Delta buttons:
LOOK_UP_DOWN_DELTA
TURN_LEFT_RIGHT_DELTA
MOVE_FORWARD_BACKWARD_DELTA
MOVE_LEFT_RIGHT_DELTA
MOVE_UP_DOWN_DELTA
Custom Key Bindings
Original ZDoom's key bindings can be quite annoying so if you'd like to use the spectator mode it would be nice to customize controls. When your program calls init() method, vizdoom.ini will be created in program directory. It will contain default ZDoom engine's settings. Find [Doom.Bindings] and change them as you like.
Snippet showing how to set WSAD keys as moving buttons and enable mouse.
[Doom.Bindings]
...
w=+forward
a=+moveleft
d=+moveright
s=+back
freelook=true
...
Q-Learning with Theano and Lasagne
This tutorial was created in 2016, equivalent examples that use more modern libraries can be found here.
This short example shows how to use Lasagne to create a convolutional network that is able to learn the simpler_basic scenario. It is mostly a descrption of the code that can be found here thus code snippets won't be abundant.
The example uses Lasagne and Theano so some prior knowledge how they work would be helpful.
Description of the basic scenario can be foud here. Simpler basic works the same but uses different textures for better contrast (learning is faster). The same code can be used for training on basic and rocket_basic (like basic but with a rocket launcher instead of a pistol) but requires some tinkering with parameters (e.g. number of epochs, frame_repeat, learning rate etc.) and can last significantly longer.
Power-hungry, high-end hardware is not required to run this code in bearable time. It was written with avarage laptops in mind so unless your computations run on a potato you should be able to see good results (~70pts on simpler_basic) in couple of minutes. If you use potatos after all or are trying to train on rocket_basic or basic and it takes too long try to lower screen_resolution.
Q-Learning
The example uses Q-Learning and implements it similarly to Google DeepMind's DQN. I assume that you know how Q-Learning works. If you don't I recommend watching AI lectures by Dan Klein and Pieter Abbeel (preferably taking the whole course).
Functions and Stuff
- preprocess - function which downsamples the image and changes pixels from bytes to 32-byte floats in [0,1],
- ReplayMemory - class for storing transitions (the most recent ones) experienced by the agent. Each transition consists of 2 images (states before and after the transition), index of the performed action, reward and a boolean value saying whether the second state was terminal or not.
- create_network - function that creates the network in Theano. It returns the network object and functions using it to learn and output Q-values.
- perform_learning_step - function that first performs an action according to epsilon-greedy policy and stores the transition in the replay memory. Epsilon-greedy policy, with probability epsilon chooses a random action and the best action (at least according to current estimates) with probability 1-epsilon. Each step ends with using randomly sampled (from the memory) mini-batch and running single step of rmsprop on the network.
Program Overview
The program starts with initialization (described in previous segments) and sets some parameters. Then all possible actions are generated (3 buttons, 2^3 actions so the network has 8 outputs), the network and replay memory are created.
After initialization the learning begins. It involves multiple training epochs. Each epoch contains many learning steps (perform_learning_step). Throughout learning epsilon is linearly decreased which means that early on, the agent will make completely random actions (exploration) and will start to do something reasonable later on (exploitation). Each training epoch ends with multiple test episodes during which epsilon is 0, so no exploration is allowed. Average, maximum and minimum results of the agents are printed and weights of the network are saved.
After training DoomGame is reinitialized to different mode and the game window is shown so you can watch the agent perform its magic.
Network
The network takes the state as input and returns one Q-value for each available action. Having a single grayscale image of size 30x45 and 8 actions (3 buttons giving 8 combinations of ons and offs) we arrive at 1350 inputs and 8 outputs. A different architecture could be proposed that consists of 1350 + 3 (one additional for each button) inputs and 1 output. This representation seems conceptually better but requires multiple forward passes to compute all Q-values for a single state so it's more computationally demanding.
Here goes some code description!
First, Theano variables are created. Note that the variables are not scalars. It is so, because the network input can consist of multiple examples at once which is beneficial due to easy parallelization of neural networks.
s1 = tensor.tensor4("States")
a = tensor.vector("Actions", dtype="int32")
q2 = tensor.vector("Next State's best Q-Value")
r = tensor.vector("Rewards")
isterminal = tensor.vector("IsTerminal", dtype="int8")- s1 - is the state (image) at the begining of the transition. Grayscale images are used here so normally we would need 3 dimensional tensor (1 for the number of examples and 2 for image dimensions), however, Lasagne's implementation of 2d convolution requires 4-dimensional input. Fortunately it is not a big deal since reshaping of Numpy arrays takes constant time.
- a - index of action performed in the transition.
- q2 - best Q-Value of the state after the transition.
- r - reward obtained during the transition.
- isterminal - boolean value saying whether the destination state was the terminal one.
Next, the network object itself is created:
dqn = InputLayer(shape=[None, 1, resolution[0], resolution[1]], input_var=s1)s1 is set as an input of the network. Note that the shape is 4-dimensional and the second dimension is set to 1. The first dimension is None to make Lasagne not care about number of examples - it can take a batch of any size. This way we can use the network for training on batches of different size as well as for evaluation when we usually (in reinforcement learning naturally) have only 1 example at a time.
After the input layer (which actually does nothing special except for remembering dimensions) it's time for the convolutional layers. 2 convolutional layers are used with square filters of sizes 6, 3, strides 3 and 2 and ReLU nonlinearities.
dqn = Conv2DLayer(dqn, num_filters=8, filter_size=[6, 6], nonlinearity=rectify, W=HeUniform("relu"),b=Constant(.1), stride=3)
dqn = Conv2DLayer(dqn, num_filters=8, filter_size=[3, 3],nonlinearity=rectify, W=HeUniform("relu"),b=Constant(.1), stride=2)
We add yet another layer (fully connected this time):
dqn = DenseLayer(dqn, num_units=128, nonlinearity=rectify, W=HeUniform("relu"), b=Constant(.1))At this point we can call ourselves trendy as 3 layers are enough to label this deep learning (trendy). Yay!
3 tiny layers is not really so much but is sufficient for this accordingly tiny example. To tackle more complicated problems more robust networks will be needed.
Finally, we add the output layer with 8 outputs and no nonlinearity (we want the output to dqn = DenseLayer(dqn, num_units=available_actions_count, nonlinearity=None) arbitrary real function).
dqn = DenseLayer(dqn, num_units=available_actions_count, nonlinearity=None)Now, as we have the network ready, we want some Theano functions do something useful. To learn the Q-values we ought to minimize error between current values and target ones. The general idea of what we are trying to achieve is presented in the formula ("learned values" in particular):

If you don't know/understand the formula I again recommend AI lectures by Dan Klein.
First we compute the current approximations of Q-values and replace them with proper ones (reward + discounted best Q value of the next state). We only want to update Q-values for actions that were actually performed so we only replace a single Q-value for each input state. Finally the updates are computed (with fancy rmsprop)
q = get_output(dqn)
target_q = tensor.set_subtensor(q[tensor.arange(q.shape[0]), a], r + discount_factor * (1 - isterminal) * q2)
loss = squared_error(q, target_q).mean()

params = get_all_params(dqn, trainable=True)
updates = rmsprop(loss, params, learning_rate)
Now we are ready to compile (Theano's actually compiling something under the hood)! 3 functions are created:
- function_learn - takes learning stuff as input and returns mean loss, performs backpropagation in the mean time,
- function_get_q_values - takes the state(s) and returns q values without any learning,
- function_get_best_action - takes a SINGLE state and returns index of the best action. It's not that necessary but is convenient.
function_learn = theano.function([s1, q2, a, r, isterminal], loss, updates=updates, name="learn_fn")
function_get_q_values = theano.function([s1], q, name="eval_fn")
function_get_best_action = theano.function([s1], tensor.argmax(q), name="test_fn")
Execution
When you start learning_theano.py script you should see some console output ("Initializing doom ..." etc.) and wait for the network to compile (it may take a minute or so). Then, a progress bar will appear - its time estimates are very good so if you see something like 3 hours for one epoch, it may be a good idea to find better hardware (or use GPU if you haven't enabled it in Theano yet).
After each epoch ends scores will be shown: training first, then testing. After 5 epochs mean result of testing should be around 70 (which results in quite reasonable behavior). After 20 epochs (which is set as the limit) it should reach ~80 (~83 is about as far as you can get so 80 is pretty good).
After every epoch network's weights are saved to "weights.dump". After all epochs hte weights are loaded and the agent shows the skilles it acquired.
Change it, play with it and let me know in case I happened to write something stupid.